Development Workflow
This is the project-wide development workflow for TEAMMATES.
Overview
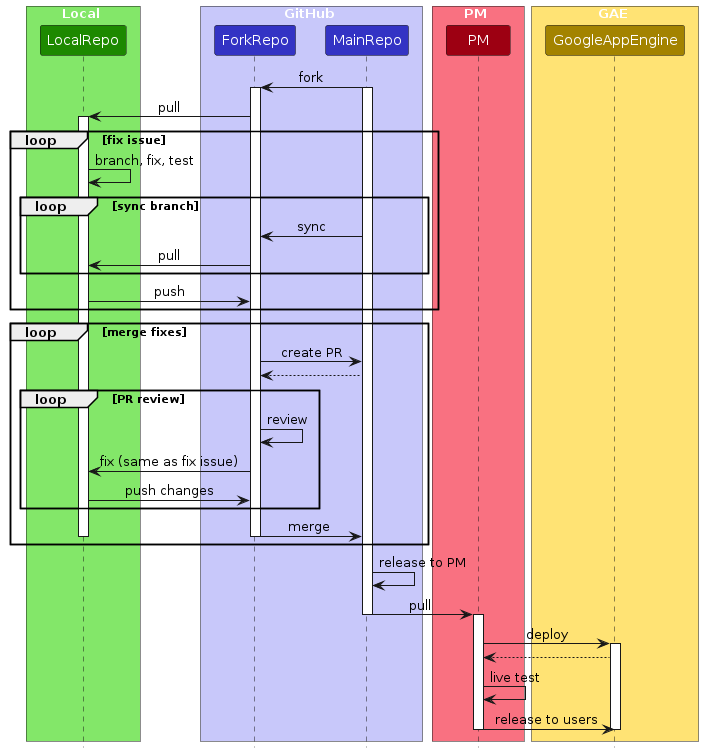
- This workflow is an adaptation of the GitHub flow.
- If you need any help regarding the workflow, please post a new issue in our issue tracker.
- It is assumed that the development environment has been correctly set up. If this step has not been completed, refer to this document.
You are also encouraged to be reasonably familiar with how to work with your own local copy of TEAMMATES.
The following are the roles involved:
- Dev: fixing issues
- Reviewer: reviewing pull requests (PRs); usually a core team member
Roles are related to the development process and they are different from Positions, which relate to the organization structure of the TEAMMATES developer community.
Fixing issues
Role: Dev
This instruction set will use the issue Remove unnecessary System.out.printlns from Java files #3942 as an example.
Step 1: Pick an issue to fix
Our issue tracker contains bug reports, feature requests, as well as suggestions for enhancements. You are free to work on any of the issues listed there.
- If you are a contributor, there is no need to get the issue assigned to you.
- If you are a core team member, assign the issue to yourself and assign it a milestone. You are expected to open a PR for this issue within a week; inactivity for a longer time may result in the issue being un-assigned so that someone else can work on it.
- While not required, the following gestures are appreciated:
- Indicating your interest in working on any particular issue by commenting on the issue thread itself.
- Refraining from working on issues that are assigned to someone else or have open PRs.
- (Optional) You can discuss, via the issue tracker, the alternative solutions before choosing one to implement. Such a discussion reduces the chance of a rejected fix or a misunderstood issue.
The issue labels may help you in choosing which issue to fix.
Step 2: Start clean from a new branch
In most cases, you will start the PR from the master branch. There are scenarios where you are required to start from another branch instead:
- You are creating a hot patch: start from the
releasebranch. - You are working on a long-lived feature branch (a branch which contains multiple commits from possibly multiple authors, used for major feature development/refactoring): start from that branch.
For brevity, this instruction set will use master branch as the base branch. Any reference to the master branch should be replaced with the base branch that applies to your case.
Start off from your
masterbranch and make sure it is up-to-date with the latest version of the main repo'smasterbranch.git checkout master git pullCreate a new branch to push your commits into. If you have commit access and need to push into the main repo for some reason, name it
{IssueNumber}-{some-keywords}, wheresome-keywordsare representative keywords taken from the issue title.git checkout -b 3942-remove-unnecessary-println
Notes:
- Do not combine fixes for multiple issues in one branch, unless they are tightly related.
- Your
masterbranch must never be ahead of the main repo'smasterbranch at all times.
Step 3: Fix the issue
If this is your first issue, you may want to look at our coding and testing best practices as well as coding conventions (links given here).
Make the changes to the code, tests, and documentations as needed by the issue.
Commit the changes to your branch.
git add -A git commit- You may commit as many times as you wish while you are making the changes. It is, however, a good idea to commit at meaningful points to keep your branch reasonably clean.
- Use meaningful commit messages (e.g.
Add tests for the truncate method). Here is a good reference. - If you introduce changes that are incompatible with the prevailing data storage schema (afterwards "breaking changes"), a data migration is necessary to be done by the core team. If a data migration is necessary to take the issue forward:
- Make sure that the core team (or at least your reviewer) is aware of this.
- Follow data migration best practices.
- Your changes should initially work for both the old and new versions of the data schema. It is fine if an unclean hack is necessary for the new code to work under the old data schema.
- Mark clearly in the code which parts are tailored specifically for the old data schema, especially if an unclean hack is used.
- Concurrently or immediately after the breaking changes are merged, you need to create a client script to migrate all data following the old schema to the new schema.
Sync with the main repo frequently. While you were fixing the issue, others might have pushed new code to the main repo.
Update your repo's
masterbranch with any new changes from main repo, then switch back to your work branch.git checkout master git pull git checkout 3942-remove-unnecessary-printlnOption 1: merge those updates to the branch you are working on.
git merge masterOption 2: if you are confident with rebasing, rebase your changes over the latest
masterbranch.git rebase masterIf there are updates to the dependencies on the build configuration, you should update your local copies accordingly.
Before submitting your work for review, here are some things to check (non-exhaustive):
The code is properly formatted for readability.
The code base passes static analysis (i.e. code quality check):
./gradlew lint npm run lintAll affected tests are passing on your dev server.
You are more than welcome to also ensure that all tests are passing on your dev server.Staging-tested (if need be): If your new code might behave differently on a remote server than how it behaves on the dev server, ensure that the affected tests are passing against the updated app running on your own GAE staging server.
No unrelated changes are introduced in the branch. This includes unnecessary formatting changes.
All changes or additions to functional code are accompanied by changes or additions in tests, even if they are absent before.
All new public APIs (methods, classes) are documented with header comments.
Documentations are updated when necessary, particularly when there are changes or additions to software design as well as user-facing features.
Push your branch to your fork, or to the main repo only if necessary.
git push {remote-name} 3942-remove-unnecessary-printlnIf the above command does not work e.g. because of rebasing, do a forced-push:
git push -f {remote-name} 3942-remove-unnecessary-printlnAnyone working on an issue, including core team members, should use branches in his/her own fork instead unless the branch needs to be in the main repo. Such cases include:
- The branch is being worked on by multiple people.
- The branch contains changes that need to be trialled by other core team member.
Step 4: Submit a PR
Create a PR with the following configuration:
- The base branch is the main repo's
masterbranch. - PR name: copy-and-paste the relevant issue name and include the issue number in front in square brackets,
e.g.
[#3942] Remove unnecessary System.out.printlns from Java files. - PR description: mention the issue number in this format:
Fixes #3942. Doing so will automatically close the related issue once the PR is merged. - Ensure that "Allow edits from maintainers" is ticked.
- You are encouraged to describe the changes you have made in your branch and how they resolve the issue.
It is not required that you submit a PR only when your work is ready for review;
make it clear in the PR (e.g. in the description, in a comment, or as an s.* label) whether it is still a work-in-progress or is ready for review.
Note: if the PR does not fix an issue completely, observe the following:
- Use an appropriate PR name (at your discretion) instead of copying-and-pasting the relevant issue name.
- Use
Part of #3942as the PR description. Do NOT use any of the special keywords.
Step 5: Following up
Once a PR is opened, try and complete it within 2 weeks, or at least stay actively working on it. Inactivity for a long period may necessitate a closure of the PR.
Labels s.* (status labels) are used to indicate status of PRs.
Their full descriptions can be viewed under the labels page.
Code review
Your code will be reviewed, in this sequence, by:
GitHub Actions: by running static analysis.
Most of the tools will display the cause of the failures in the console; if this is not the case, you can run any of the static analysis tools and obtain the reports locally.
You can check how to run the static analysis locally here
Ensure that the static analysis passes before triggering another build.GitHub Actions: by building and running tests.
If there are failed tests, the build will be marked as a failure. You can consult the CI log to find which tests.
Ensure that all tests pass before triggering another build.
A short summary on how to run the tests locally can be found hereReviewer: a core team member will be assigned to the PR as its reviewer, who will approve your PR or suggest changes.
- Depending on the complexity of the issue, there may be multiple reviewers assigned to the PR.
- Sometimes, the additional reviewer(s) will focus on code style and maintainability.
Feel free to add a comment if:
- a reviewer is not assigned within 24 hours.
- the PR does not get any review within 48 hours of review request.
- you want to clarify or discuss about the suggestions given by your reviewer.
Updating the PR
If you are tasked to update your PR either by GitHub Actions or by your reviewer, do not close the PR and open a new one. You should make and push the updates to the same branch used in the PR, essentially repeating step 3.
Remember to add a comment to indicate the PR is ready for review again, e.g. Ready for review or Changes made.
If you have permission to change labels, you may additionally change the s.* PR label as appropriate.
The cycle of "code review" - "updating the PR" will be repeated until your PR is approved by all the parties involved (s.ToMerge).
Step 6: Prepare for merging
The core team member responsible for merging your PR might contact you for reasons such as resolving merge conflicts. Depending on the situation, this may necessitate more changes to be made in your PR (e.g. if your PR is functionally conflicting with a recent change), however this rarely happens.
Your work on the issue is done when your PR is successfully merged to the main repo's master branch.
Reviewing a PR
Role: Reviewer
- The reviewer of a PR is the assignee of it.
To remove whitespace-only changes from being shown, append ?w=1 to url of the /files page of the PR (the "Files changed" tab).
GitHub's review feature is to be used in this task.
- Ensure that the GitHub Actions CI build is successful.
- Ensure the following:
- Naming conventions for PR and branch are followed, and
Fixes #....or similar keyword is present in the PR description. - The items in this list are all satisfied.
- The solution is the best possible solution to the problem under the circumstances.
- The code is up-to-date with the latest
masterbranch (or whichever base branch applies), or at least no conflict. If this is not the case, ask the dev to sync it.
- Naming conventions for PR and branch are followed, and
- If any of the above are not OK:
- Add comments in the diff to suggest changes. Bundle the review comments with the "Start a review" and "Add review comment" features, and finish it with "Request changes", preferably with the review summary.
- Change the status of the PR to
s.Ongoing.
- If the code is OK in all aspects, change the PR status to
s.FinalReviewand "Approve" the PR.
Merging a PR
Role: dev (with push permission), or reviewer
This instruction set will use the issue Remove unnecessary System.out.printlns from Java files #3942, resolved by PR #3944, with master branch as the base branch, as an example.
Merging can be done anytime as long as the
s.ToMergelabel is present and GitHub gives a green light for merging. There are a few scenarios where GitHub can prevent merging from proceeding:- Merge conflict: the PR is conflicting with the current
masterbranch; the author will need to resolve the conflicts before proceeding. - Outdated branch: the PR is not in sync with the current
masterbranch. If the PR allows edits from maintainers, simply update the branch using the "Update branch" option; otherwise, the author will need to sync it themselves before proceeding.
It is up to the dev/reviewer's discretion on whether the merge conflict or outdated branch necessitates another review.
In general, unless the changeset is functionally conflicting, there is no need for another review.- Merge conflict: the PR is conflicting with the current
When ready for merging,
Merge with "Squash and merge" option. Format of the commit message:
[#Issue number] Issue title as given in the original issue (#PR number)e.g.
[#3942] Remove unnecessary System.out.printlns from Java files (#3944).Where appropriate (e.g. merging a long-lived feature branch), the "Rebase and merge" option can be used instead.
Apply a
c.*label to the PR to indicate the type of the PR, if it has not been done before.
If the PR necessitates a data migration, create a data migration issue after merging.